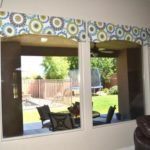
Oh… making things level. I’m that girl that straightens pictures and art in random homes or offices (not proud of it). Well, this project threw me for a whirl, but I have a few cheater pants ways of doing things. I’m fairly certain a real designer would laugh at me, but when you don’t know the real way to hang a cornice box and make it level at the same time you just make it up. And lots of times the made up way works mighty fine.
Before making my cornice boxes all tutorials online added like six darn inches on the side and I was wondering why in the world anyone would want their window box to stick out that far. And then I was completely finished and tried to figure out how to hang them I was like, oh, that’s why you use six inches instead of two. There was no room to attach it to the wall with only two inches, especially with it flush against the sides. I spent about a day trying to think of how to hang it and make it level, which with something 6.5 feet wide a slight adjustment on either side and you’re outta luck.
Here is my hardware invented way to hang a cornice box that worked great:
1. With painters tape make a LEVEL line where you want the top of the cornice box.
2. On each side measure two inches down and four inches in and mark (you want to hit the middle of the wood block). This is where you will attach an L-bracket.
3. Attach a block of 2×2 wood to the back of your cornice box two inches down from the top and two inches in on each side.
4. You will need another person for this part… While holding your cornice box level, centered, and flush against the wall with the L-bracket on top of the block of wood, make a mark where the L-bracket meets the block of wood. Take the cornice box down and predrill a pilot hole.
5. Put the cornice box up again and drill to the L bracket with at least a 1.5″ wood screw. Once it is attached rest a level on the box and tighten or loosen each side until it is completely level. The screw doesn’t have to be completely drilled in to hold the box… just enough to hold it in and allow for adjustments.
Never be crooked again!
Happy Creating!

Leave a Reply