i am hardware

just searching for sawdust and sunshine

  • Email
  • Facebook
  • Instagram
  • Pinterest
  • Home
  • Blog
  • Project Gallery
  • 2018 DIY Projects
  • Supporters
  • About

2016/09/23 by: Sarah

How To Make a Wooden Cutting Board

13703211_1014796748638475_1892231352_n1
Nicole and Danny by Katie Hill

My sister-in-law got married this summer to a total rock star. I am so happy for them. I wanted to give her something meaningful but practical so I made a cool cutting board with scrap wood in the shop. To incorporate both of them, and their life ahead, I found wood from where they both grew up and their future. Her family is from California, her fiance is from Washington and they now live in DC. So… walnut from Cali, a beautiful maple from Washington, and an oak wood from the east coast.

Warning: this is super cheesy, but you gotta know when it comes to weddings or kids I get really corny, really fast. The card read, “May your marriage be as strong as oak, as sweet as maple and as beautiful as walnut.” I think she liked it.

13628052_1771195863098784_185997098_n
(I also really want her to have babies, so included a few other gifts for fun.)

Steps to a cutting board with a random design:

1. Gather your wood, about the same length is great and height is helpful (or cut it down to that), width doesn’t matter
make-a-cutting-board-wood-scraps

2. Plane or cut a straight edge (needed to glue together securely), then cut your wood into strips with a table saw, whatever width you’d like
make-a-cutting-board-cut-into-strips

3. Arrange your pattern. Mine is pretty random.
make-a-cutting-board-arrange-wood

4. Glue the wood on the inside, then brace. It’ll be wacky all around and that’s okay. What you need at this stage are straight cuts being glued together. The top, bottom and edges don’t matter yet. I actually had two clamps on the bottom and one on the top so it didn’t bow.
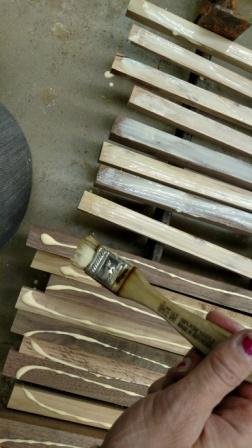
make-a-cutting-board-glue make-a-cutting-board-clamps

5. Once dry, send the board through the planer until both top and bottom are the same height
make-a-cutting-board-planer

6. The cut to size. If you want a gutter on the edge for liquid or juices, use a router
make-a-cutting-board-gutter

7. Sand, sand, sand
make-a-cutting-board-after-the-planer

8. Clean and coat with mineral oil and enjoy!

Happy Creating!
You May Also Like...

  • Live Edge Black Walnut TableLive Edge Black Walnut Table
  • Live Edge Black Walnut Table “Proud as Punch”
  • Live Edge Table, Metal Base BuildLive Edge Table, Metal Base Build
  • Live Edge Walnut Table… Complete!Live Edge Walnut Table… Complete!
Pantry Organization- for less than $60
Live Edge Table, Metal Base Build

Leave a Reply Cancel reply

Your email address will not be published. Required fields are marked *

Follow Hardware

  • Email
  • Facebook
  • Instagram
  • Pinterest

Join the DIY-volution

Search for your favorite projects and posts:

Instagram
Join my Instagram Party!

Pindiana Jones - Follow Me!

Be featured!

woodworking plane

Hey Readers! Do you have an awesome REMODEL, a spectacular ETSY shop, a mind-boggling PROJECT, or just a fantastic house you would like to share on … [Read More...]

Recent Posts

  • Kitchen Remodel on a Budget
  • Laundry Room Remodel Progress
  • How To Decorate a Bookshelf
  • Flashback! Ana White Console Table
  • Build Your Own Computer Desk

Project Catagories

Crowd Favorites

Industrial Pendant Lamp — Easy Ikea Hack

industrial light

DIY Ski Storage Racks

How To Fix Toys (or anything) That Have Battery Corrosion

how to clean battery corrosion vinegar and a toothbrush

Overhead Hanging Storage

Parsons Chair Slipcover Tutorial

Parson Chair Slipcover

Featured on these awesome sites:

I was featured on Remodelaholic!
  • Home
  • Project Gallery

© 2020 · Fun Genesis WordPress Theme by, Pretty Darn Cute Design