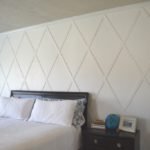
Friday I introduced this wood pattern accent wall in a post, but today you’re getting all the hairy details. This project cost about $40 in wood, $35 paint, $75? Priceless! Also, it probably took about 15 hours from start to finish, mostly because I was making it up as I went along.
The accent wall I just dreamed up during my lazy summer days. I think my husband would love for said ideas to stop! Ha! It all begins with the planning….
The planning stage. Decide on what materials to use. I cut poplar boards 2″ thick, then cut into 3/16″ strips in the woodshop. Ya, it’s a little crazy to go that slim, but I didn’t wanted the board to hang over the baseboards. For the triangles themselves I measured the room and tried different angles and sizes before deciding. Here are a few things I learned:
- Go with the width: Because it’s 210″ wide, I decided to make the diamonds 21″ wide. Aesthetically the symmetry of the width is more important than the height… meaning that if the triangles at the bottom hit at a weird spot it doesn’t look that weird, but the width will really stand out.
- Mark the middle carefully: take into account the wood width with starting your first strip.
- Play around with the angles on your miter saw. I chose a 30″ angle. I thought the sharper angles looked softer, a little more feminine. If I was doing this in an office or kitchen I think I would have preferred more of a 45″ angle for a stronger, more square pattern. Just a preference, choose what you like!
- Make pattern pieces! I used two, one for length and one to check the angles… the project goes fast with patterns to use. More on this later in the post
Next, gather materials:
- boards, if you don’t cut them yourself there are plenty of options at your local hardware store, baseboards for example
- miter saw
- level
- brad nailer
- pencil
- paint
- patience (for real)
- Ted talks or a great book on tape!
And finally the fun part, execution.
Pre-paint your wall and boards. It might need an extra coat of paint after, but it will save a lot of time at the end.
Make two patterns, one with the exact length and one angles of the boards inside your diamonds. My diamonds are 21″ apart so my first pattern is 19″ long, with 30″ angles on each end. The second pattern has 30 degree angles on each side.
Begin nailing the boards with the center board and working your way out. Check each board is level and even with your pattern pieces. When applying brad nail the board a couple of times to hold the position. Then double check the angles, level, and fit before securing it down.
If your board isn’t long enough for the whole length cut a 45″ angle at the end so that the second board you add for length can attach smoothly.
Hang long lines of boards, then cross over the other direction, cutting boards to size as you go. If you have measured correctly all the cross pieces should be the same length, saving tons of time in measuring and cutting.
When you intersect at the end with the wall, the angle can be a little tricky. It’s clearly beyond my math ability, so I brought in the big guns to explain, my twelve-year-old. What I needed was a 60 degree angle, but my miter saw can’t cut it, so I put together two 30 degree pieces to do the job. It’s 180 degrees, right? Add up all the negative angles until you get to 180, actually simple math: 60 + 60 + 60 = 180. Again my math teacher Mr. Blanch was right, I should have paid attention.
Last step is sanding where needed (if you bought pre-cut boards, you shouldn’t need to sand) and caulking until daylight is done. Then, repaint another coat if needed… I had to repaint. And viola! Done!
Before:
After:
What do you think? Happy Creating!

Leave a Reply